Tuesday, January 31, 2012

Valentines Garland

Yeah! Time to decorate for Valentines Day. I love how this holiday gives me an excuse to have way to much reds and pinks in my house.  
I'm a little slow jumping on the garland bandwagon, but thought it would be cute to make one out of burlap, then stencil letters on it.  Here's what I came up with:

I never ever decorate in my bedroom.  Once the thought of having this garland above my bed, popped into my head (say that 3x fast :)), I couldn't get over it and it had to be done! I like it so much I'm gonna have to spend sometime coming up with more decor ideas for my bedroom.


And of course one for the living room.

Here's how I made them:
I cut out four 11 x 11 squares of burlap for the garland in the living room. Then the ones in my bedroom are 9x9 squares.  Then I folded them diagonally down the center to form the triangle and sewed across the top.  Leaving enough room to pull twine through. 

Then, using a word document I typed out my letters making them as big as I'd wanted it for the garland. I chose a simple font but you could get as fancy as you wanted.  Printed them out and used these to trace the letters onto freezer paper.  Cut out the letters. Then iron onto burlap.


Place another piece of freezer paper between the layers of burlap, so paint doesn't seep through. Then using a foam paint brush I dabbed on the paint. 


After it dries for a few minutes pull off the freezer paper.  I love how the freezer paper comes off nice and clean. You don't have to worry about any glue or waxy residue being left behind. ( I had to learn this the hard way and tried using heat bond paper once. Yikes!) Then securing a safety pin to the end of a long piece of twine pull through the tops of your triangles.  Hang on the wall and you're done!


More Valentines ideas coming soon!  
Pin It!

Friday, January 27, 2012

Simple Star

This is another simple, quick, and frugal idea.
A few weeks ago I was out on a walk with my family and I saw a pile of these sticks on the ground.  I was, for whatever reason, drawn to them.  So I carried them home and decided to make a star out of them.
 I liked the thought of bringing a little bit of the outdoors in my home decor.   I made this star using sticks, hot glue, and a little spray paint.

 Used a little but of yarn or string to tie the ends together. 
Then, had a can of this pretty blue paint in my garage.  I'm not sure why but lately I'm really drawn to this sky blue color.  Which is odd cause I'm usually stuck on the color red.  So this will be a good change, I'm sure!


I'm liking it hung on my wall for now but I was also thinking it would be pretty above cabinets in the kitchen or even outside on the front of the house. Really it would  look good in any room, though.

So head outside and start gathering some sticks and make your own! Cause stick are free!
Pin It!

Wednesday, January 18, 2012

My favorite hot drink

I know this isn't supposed to be a recipe blog but I love this drink so much that I had to share. 
 I've been drinking this for years and always try to keep it in stock.  Not only is it wonderful for the cold weather but also the best for when you’re sick.  It never fails whenever I get a cold I crave this.
We always just called it Orange Citrus Drink…Haha creative huh :)  Maybe if you try it and like it (which of course you will) you’ll have to come up with a more cleaver name.
All you need is:
2 cups powdered orange-drink mix (I always use tang)
1 (3oz) pkg. presweetened powdered-lemonade mix ( I never buy the pkg. but the mix that comes in a container that is the same size as the tang)
1-1/3 cups sugar
1 teaspoon ground cinnamon
½ teaspoon ground cloves
Mix all ingredients together. Then put in an air-tight container.  The recipe says it will last up to 6mons. but I’m pretty sure I’ve used it past the 6 mons and it still tasted great. Also the recipe doesn’t make that much so I always double it.   
Heat up a mug of water and add 2 or 3 heaping teaspoons of the mix and enjoy!

Pin It!

Monday, January 16, 2012

Snowflake Table Runner


Living in Southern Utah we are used to not having much snow but usually we will have at least one or two snowstorms that leave an inch or two on the ground.  Of course it doesn't stay on the ground long, usually by the time it's two or three in the afternoon it's all melted. This year, however, we haven't had any snow, or rain for that matter! Just lots and lots of cold wind! Not very fun. 

So, this year I'm making my own snow.  First with my cute snowman wreath from the post before and now with this snowflake table runner.


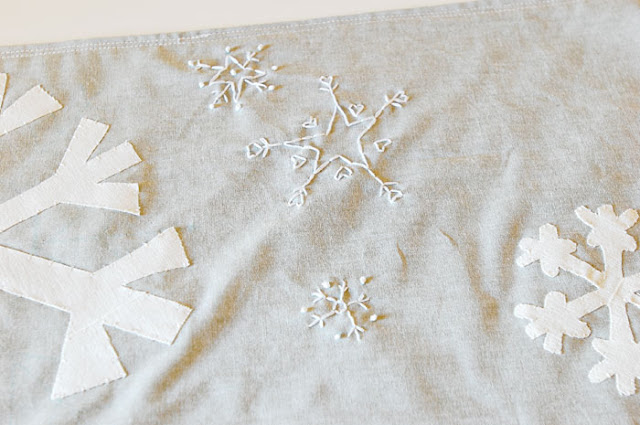
I knew I wanted the background fabric to be simple with no crazy designs so that the snowflakes would "pop".  At first I tried making all the snowflakes by just embroidering but they didn't stand out as much as I'd hoped.  So I picked out my biggest snowflake and made it applique, then added one more smaller applique snowflake.  That did the trick for me! I loved the combination of the white fabric snowflakes with the delicate embroidered snowflakes.  


I slapped on a back and sewed two lines around the edge to give it a finish look (see bottom picture to see better), and that's it.  It really did come together pretty easy and quick.  

Well I hope you like my table runner! If you are making one too and have any question don't hesitate to ask!
Pin It!

Friday, January 13, 2012

Snowman Wreath

Since the holidays are over and all the decorations are put away my house feels wonderfully clutter-free.  Don't get me wrong, I love Christmas and every year I'm just as excited as the kids to put up the tree and lights and all the little knick-knacks.  By the time New Years comes around I start loosing it and can't take the extra clutter so it feels so nice to have it all put away.  
However, now my house feels a little too empty. I don't really have any wintery decorations and I wanted to make something that could stay up for the winter months.  So I wanted to share my snowman made out of a couple wreaths.  I thought he turned out rather cute! 


It was incredibly easy!  Cost me about five dollars and took me about five minutes to put together. Just a couple wreaths, raffia, and a couple twigs from the tree out front. 


I've got one more wintery idea I've been working on that I'd like to share and will get posted in the next day or two.

Enjoy!

Pin It!

Wednesday, January 11, 2012

A bit of an introduction first….
Hi! We’re Alyson and Chelsea and we will be running this corner of cyber world.  We are best friends and cousins.  Chelsea loves the home project/ crafty side of things and Alyson loves the fashion and beauty side.   Our goal is to take both of our passions and share it with you!
So please come back often and check out our fun and inexpensive ideas for fashion, beauty and home projects.

Oh and sorry pictures of us both to come soon!!
Pin It!