Showing posts with label Easter. Show all posts

Thursday, March 29, 2012

Bunny Pillow

Here is another quick Easter project...
 
In my head a holiday, of any kind, isn't complete without a pillow.  My couch was lacking an Easter/Spring pillow.  It's funny I'm finding that with each project I start out thinking it will be one way then when the project is actually complete it ends up slightly different then the origanal plan.  I can't decide if that's a good thing or not....

Anyways, I was going to put some Eastery words around the bunny but in the end decided against it. 


I knew from the beginning though that I had to make a pom-pom for the bunny's tail!  I love it! I think it gives more demension and my kids love that they can touch the fluffy tail. 

Here's all I did...
I googled a bunny image that I liked then printed it out on paper.  I traced it on heat bond paper and ironed on fabric I wanted for the bunny.  Then with scissors cut out bunny shape and iron on to fabric pillow.  I knew I wanted my main pillow fabric colorful and bright.  That way the bunny would stand out and it would screams spring. 

Then using my sewing machine I sewed the blanket stitch around my bunny.  After that I found a button for the eye and made a big fluffy pom-pom for the tail.  I didn't take pictures of the how I made the pom-pom so here is a link I found that can help if you need.  However, there are many tutorials out there so just google it and you can find one you like.


Place front and back fabric facing eachother and sew all around it leaving a opening at the bottom big enough for your hand to get through.  Stuff with cotton and sew up the bottom using the whip stitch. And youre done! Now stand back and admire your work!


Thats all for now! 

Chelsea


Pin It!

Monday, March 26, 2012

Easter Chandelier

In the mail a few days ago I received my monthly parents magazine.  Which I don't usually subscribe to but I was able to get a 2 year subscription for something crazy like 3 dollars, so i figure why not. Anyways, while I was flipping through it they have these super cute egg chandeliers, made with balloons and yarn.  I knew when I saw these I had to make them.  In the magazine though they left the balloons in and I wanted to make mine slightly different.  I made mine with two different colors and also got rid of the balloon in the center after the yarn dried. So here is my take on the parent magazines egg chandelier.

Here is what I made:


I wish they would have photographed a little better. They really do stand out better then this in real life.  There is just way to much light coming through them to get the real feel.  However, I love out these cute eggs look hung in that space above the T.V. in my living room and I even love how delicate they look!

Here is what you will need if you decide to make them too:

A large bowl, yarn, balloons, Elmer's glue, and not in the picture lots of newspaper to cover your work space.  This is a messy project! 

Do you remember making paper maiche as a kid?  Well this is just like that only you are using yarn instead of paper.  So mix your glue with water.  The magazine says to use 3 parts glue to 1 part water.  But I just kind eye balled it and adjusted as I went.  The first balloon I did I felt like I didn't mix in enough water so I adjusted it for the next few balloons and felt like it worked better.  

After I wrapped the balloons with the yarn I tied a new piece of yarn to the tops and hung them to dry.  Ignore the little balloons I was going to see if I could make it work in a smaller version but I don't think I wrapped enough yarn on them so they didn't really work out.  I may or may not try it again....we will see.  


I gave them close to 24 hrs to dry. This next step made me nervous it would all just crumble and be a hopeless mess.  I popped the balloons and as they deflated it did cause the yarn to be pulled in with the balloon it a little.  I just had to work with it a little and carefully help separate the yarn from the balloon. The yarn bounced back and held it shape pretty good after that.  Because the balloon had lots of dried up glue residue on it that clung to the yarn I did have to go through and pick some of it off. 

After I got it cleaned up I tied a clean piece of color matching yarn to the top of chandelier.  Then using a push pin I wrapped a little bit of the yarn around it and pushed it into the ceiling.


I love how festive they make my house feel! It's really feeling like full blown spring in and out of my house!  I love it!
 

Hope you enjoyed!  Please don't hesitate to ask questions, if you have any.

Chelsea
Pin It!

Friday, March 23, 2012

Easter Tree

Such a fun and easy project!

An Easter tree!!  Seriously why should Christmas have all the fun.

I wish I could take credit for coming up with this idea, however, it was my mom that started this.  It was somewhere around the time I was 9 or 10 years old when she first made it.  Every year since it decorates moms table or counter top.  I always looked forward to seeing it and eating all the yummy treats that were put under it.  

Now I will keep that tradition going for my kids :) 

(I'm aware this pic looks weird.  I needed a darker background so you can see the detail better.)

Here is all you need.  A big dried up weed (that reminds you of a tree), spray paint, a basket, dry floral foam, streamer paper (if you decide to make blossoms), and goodies to put under your finish tree :)

This is an easy one to involve the kids. Have them go on a walk with you to help find the perfect Easter tree weed.  My kids had lots of fun with this! and it did me good to get some exercise and fresh air.


I painted my basket sky blue and my weed white. Once dried, I place the dry floral foam in the bottom of the basket.  Cut the stem of the weed down to size then push down into the foam. I also got out some scissors and trimmed the tree to the size and shape I wanted.


Then place grass over the top of the foam.


Add favorite Easter treats. :)


My mom always put tiny Easter ornaments on her tree.  I did see some at Joannes for 5 dollars for a pack.  For whatever reason I didn't grab them while I was there.  I'm hoping to go back and get some but for now I thought blossoms, made out of streamer paper, would be fun. 

Here's how I made mine.  I cut out around 1 inch squares.  Fold in half, then in half again. You'll end up with this:


Next, cut the part of your square that is open into a heart shape.


Open up and you will end up with this:


Now dab a tiny big of Elmer's glue in the center of blossom and stick on branches.


My moms Easter tree is still looking good even after all these years.  So if stored carefully it should last you for a lifetime.  However, if don't want to worry about storing it, it costs next to nothing to make and would be easy to make again every year. 

Enjoy!

Chelsea
Pin It!

Tuesday, March 20, 2012

Easter Eggs

Hi! Hope everyone is having a good week so far.  I am officially in the spring cleaning mood, some of which I got done yesterday.  I feel like every inch of my house either needs reorganizing or major cleaning.  It's just finding the time to get to it all.  I'm not sure if its the time change that's throwing me off still or what but time has been flying by!  As I write this I can't believe it is already past 2 o'clock! 

I find that once I get my everyday cleaning done there just isn't enough time to get to that deep cleaning that I want and need to do.  So my goal for the next week or two is to do at least one extra deep cleaning chore a day.  I have the motivation right now but we will see how that holds in a day or two.   

Well on to my next Easter craft!!

 I don't know about you but I Love those cute decorative balls that people but in glass containers and put either on a table or shelf.  My problem with them is I can't justify me spending what little money I have on them.  So the other day I was thinking how cute it would be to have eggs like those cute decor balls. I thought I'd try and make my own, on the extreme cheap.  
First, I thought about what items I already had that could be used.  I always keep a stash of those plastic Easter eggs out in the garage so every year I don't have to go out and buy more. So I knew I wanted to use those cause even if I didn't already have them they are super cheap to buy and u get a million of them in a bag (OK slight over exaggeration :))  I did go out and buy string for it but afterwards I realized I probably could have used embroidery floss instead which I have a stash that has accumulated over the years.

Here was my first attempt:

I used Elmer's glue and some colorful string. 


Turned out just okay, I thought.  The glue made the plastic egg slippery and my fingers sticky so it took some patience and time to get the string on just right.  As you can see, however, it is far from perfect.  I kept thinking if I had a thicker string it would have gone smoother and faster.  So as I was laying in bed one night it came to me!  Why not use strips of fabric and hot glue! 

I went through my stash of fabric and pulled out pieces that I've always loved but never had the right project for. Cut out long 1 1/2 to 2 inch strips and just like you would if you were making a rosette. I twisted it as I glued it onto the egg. 

My only advice is to only apply a small section of glue at a time. Otherwise, it will be completely unavoidable of burning off your fingertips.  So starting at the top of the egg I inch by inch glued then wrapped then glued and wrapped until I reached the bottom.  This method went a ton quicker then using the string and since I used hot glue I didn't need to worry as much about the fabric slipping around on the egg. It stayed put pretty darn good.


So I whipped up a few more and place them in a cute spring pie dish I had with colorful grass and there you have it!


A simple, quick and very inexpensive but super cute Easter craft!


More to come soon!
Pin It!

Monday, March 12, 2012

Easter bean bags

I thought I'd dive into a few Easter projects.  I really don't have a ton of decorations for this holiday and decided that needed to change this year. 

I had a thought a few days ago that my kids need holiday decor around the house that they can actually touch and play with.  What a concept, right?!  So the chick bean bag was born....


This is a good afternoon project.  I tried to just use material I already had so the only thing I went out and bought for this was beans.  They were one dollar a bag and I bought three bags but only used two. Here are the steps I took to make these cute little chicks:

First either trace or print out an oval or egg shape.  Mine are around 5 inches long and 4 inches wide.  Cut two pieces of fabric big enough to fit the egg on it with 1/2 inch around all sides.  Trace shape with a fabric pencil onto the fabric.  Do not cut out yet.

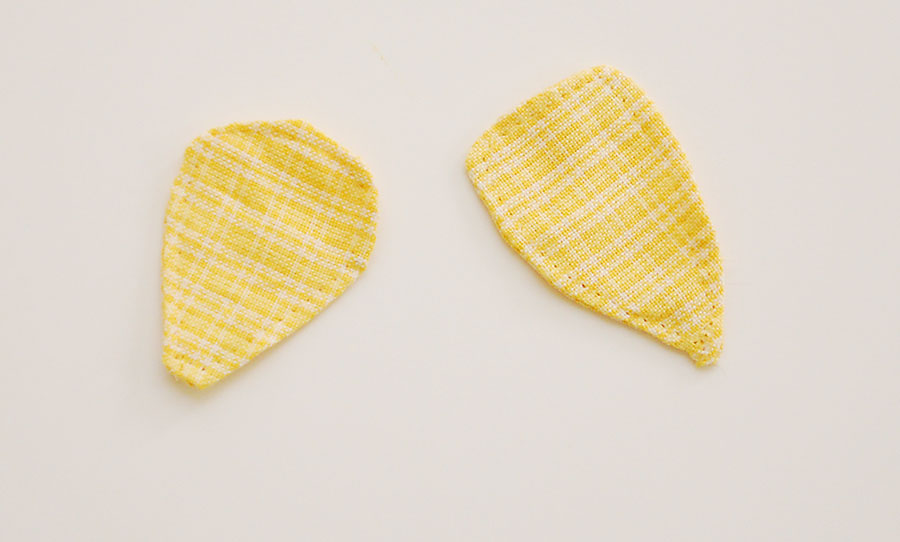
Next you will want to trace pieces for the wings.  I drew a teardrop shape, also double layers for both wings.  After cutting the wings out, place right sides together then sew around leaving a small opening to turn inside out. 

Once it is turned inside out, sew a top stitch around wings.  You will be left with something like this:

Next, cut out a triangle for the beak. It took me a few tries to get it the size I wanted.  Just experiment.


Now sew on only the top part of the wings onto your top piece of the chick body.  Next, sew on the beak around all sides.


Then I sewed on buttons for the eyes. I actually ended up switching these bigger buttons out for smaller ones. I liked the look of the smaller better.  Now with both your body pieces together (wrong sides facing) sew around the body. Following the lines you traced earlier, leaving a small opening at the bottom.

Now fill with your beans.  I used lentils because they were smaller but use whatever you would like. Then I placed a pin up against the bean to hold them up while I sewed the hole closed.


Finally using your scissors clip around the chick leaving about a 1/4 inch of fabric.
There ya have it. 


You could also do the same to make eggs.  Only when sewing the fabric together put them right sides together and turn inside out before filling. Then using needle and thread use a whip stitch to sew the hole closed.


Made some kids happy!


That's it for now!

Chelsea
Pin It!