Wednesday, May 23, 2012

Keeping it Real!


I promise this blog isn't being ignored!  The problem is that my sewing machine decided to stop working when I was half way done with a project.  Ach!! Of course this had to happen when I had 3 or 4 different projects planned that all involved sewing. 

I'm so sad not to have my sewing machine working right now! and unfortunately funds are low so it will be a few weeks before I'll be able to get it fixed.  So please be patient with me! I do have a project I'm working on that I'm excited to share with you but I probably wont be able to get it done and posted until next week. 
.......
So since it's my daughter's last day of school today and I plan on spending lots of time in my swimsuit on a sandy shore.  I wanted to share a workout plan I found that I've been trying to do so I feel comfortable being in said swimming suit. This is from Studio  5 I don't get a chance to watch this show as much as I used too but I love whenever I can.  They usually have so many cute ideas and there workout person on the show is amazing! I've tried a few of her exercises before and I've loved them!  This time though they have a free 4 week workout plan to get ready for swimming season.  I'm a week or so behind.  I'm only in the middle of week 2 and I think they are on week 3.  I'm really loving it so far!  I hit a HUGE workout rut a few months back and it's nice feeling motivated again!  My body has been sore but it's a GOOD sore!  The workouts are short and sweet but you can make it as long as you want. I always try to make it 30 mins but by the time I get to 20 mins my muscles are tired and I just can't do anymore. 


So if you need some motivation too Check it out! Click on picture or link below.


Pin It!

Wednesday, May 16, 2012

DIY Stool (photog prop)

I've had a few different photo sessions last week and through this week and I really wanted a little stool of some kind to sit kids on. Well the easiest way for me to get what I want/need is to make it!   I actually started out thinking I'd make more of a crate but by the time I was half way done I decided to try something different.  I'm so glad I did!  I love the way it turned out!

Here's what I did:

I still have pallet wood left so most of this is made from pallet wood.
I mostly just eyeballed the width/length/height that I wanted it to end up.  I also used a basket that was about the measurements I needed to help me come up with what to cut the wood at.

Start out by cutting two length pieces and two width and nail or screw together.  I started out with nails, mostly because I was experimenting as I went along.  Then I went back and added screws to secure it all together.


Then cut the board to go on top.  I tried to cut them so they were flush with the frame.  My cuts are not perfect but I like the roughed look.


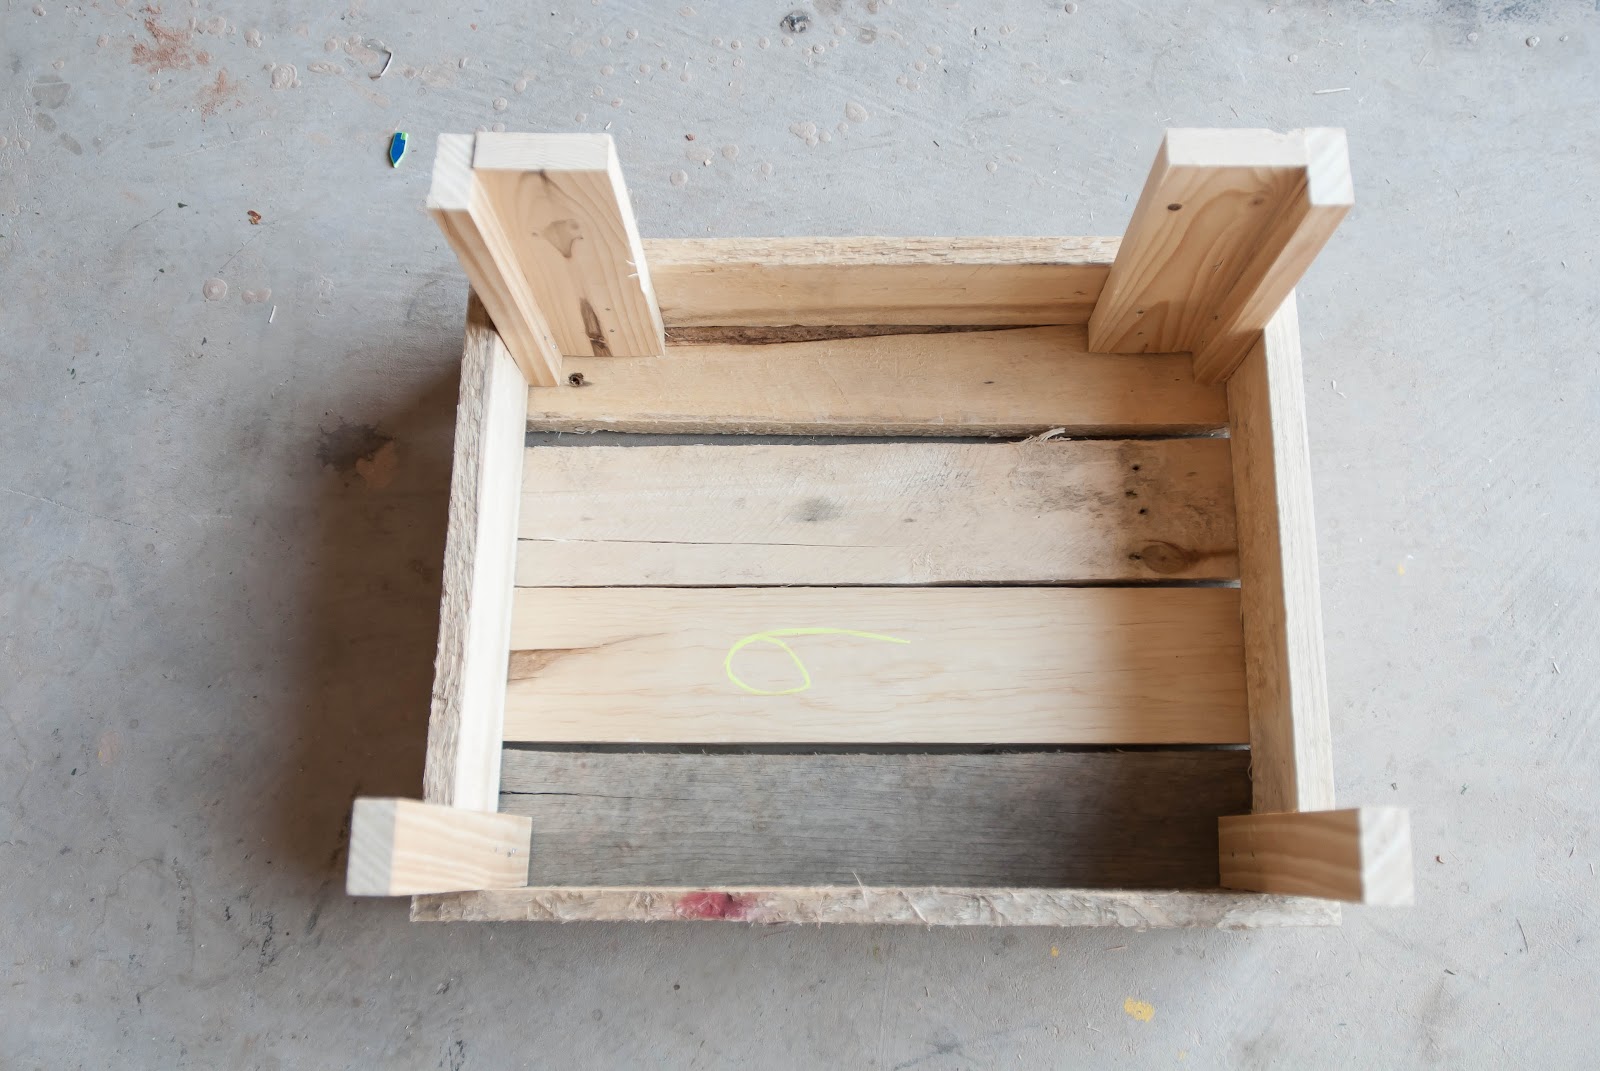
Next I added 1x2s in each corner, those measurements just depended on how tall I wanted the crate/stool to sit.  At this point I was still going to make a crate but then I flipped it over to make sure it was sitting high enough and I thought it looked pretty cute as a stool.   


So I added 1x3s next to the 1x2s to give the legs added support. Plus, I wanted the legs to have more of a stocky look.  I nailed the legs into the frame and also to each other to help hold them tightly together.  Once again since I was making it up as I went along I didn't use wood glue but I would highly recommend it! 


I actually only did that to the front legs but only because I ran out of  1x3s.  I will do the same to the back legs when I can get more wood.

Look how fun it's starting to look!  So much more cuter looking than a crate...I think anyways


Next, sand down any rough edges or rough surfaces.  Then paint.  I'm a big fan of spray paint, so much easier and faster!


I ended up making a another stool but made it a little smaller.  I did everything the same except I had 2x2s that I used for the legs.


This is how it turned out in the photoshoot.  It was kinda funny how the blue matched her outfit exactly :) If you want to see more pictures from that session click here.


Have a great day!

Chelsea
Pin It!

Thursday, May 10, 2012

To do OR not to do

My constant internal debate is whether or not its worth it to do certain projects myself.
For home decor and even a lot of wood working I feel like it is defiantly worth it!  Saves money and its so fun for me to see what I've accomplished. 

BUT

When it comes to some home improvement jobs like.. fixing appliances that have broken, or even cosmetic things like molding, tiling, etc. I'm not sure.  When it comes to fixing anything on our vehicles, that's a no brainer.  We know absolutely nothing about cars so a professional would have to do that. In that case I'm sure we would do more damage than good. 

Anyone else think about this?  I tend to over think everything so maybe this is one of those things I'm just thinking way to much about. :)

Well I bring this up because I recently tried something I always thought wouldn't be worth even attempting.  Dog grooming.  My husband and I are the owners to two dogs.  One is a pure bred springer spaniel and the other is a springer mix.  At least once a year (usually every spring) we take them in to get buzzed.  When they come out they look so sleek and amazing.  The only problem is it costs 100 dollars to get both them cut! Ouch!  Each year I cringe when it's time to get there hair clipped.  I hate having that much money going towards the dogs.

So this year I pumped myself up and decided I wanted to try and do it myself.  I convinced my husband I could do it and he gave me the green light.  The only thing that made him and I hesitate is I had to buy clipper which is between 40 and 50 dollars.  So if I screwed it up it would cost us more then just taking them in to have it done by a professional.

So I watched the little video of' how to clip your dogs hai'r that came with the clippers and I dove right in.  Here is the before picture:

Meet Krypto, looking very shabby and in a desperate need of a hair cut.


Now here is Krypto after I cut his hair!


Doesn't he look amazing!  Like a completely different dog.

Now I'm completely happy with the results of my DIY dog grooming.  I admit its not perfect, It was difficult getting around his feet and they aren't cut as short as they should be.  Also, it took me at least 3 hours per dog.  So it takes time but for me it was completely worth using up a day or a couple afternoons to cut my dogs hair myself.   This year I only saved us 50 dollars, since I had to buy equipment, but next time they need a hair cut this will save us at least 100 dollars!  So excited about this!

Through this process I feel like I've gained some confidence in trying new and different projects.  Sometimes I think we just don't give ourselves enough credit and we CAN learn new things.  We might actually surprise ourselves in all the things we can do! 

Hopefully, this post will give you the extra boost to attempt that project you've been wanting to make but not sure u can do.

Chelsea
Pin It!

Monday, May 7, 2012

Newspaper Wreath

I have had a very interesting weekend!  My computer completely died!  I lost a bunch of pictures and my photoshop program.  I'm so bummed!  I've pretty much expected my computer to die but I thought it would hang in there longer.  :(
I have such a love hate relationship with computers!! My sweet amazing and very supportive husband had me go and get a new computer.  I still can't believe I have a new computer!  I have been day dreaming about getting a new one for such a long time!  I'm in love with how fast it is!  My time will be now be spent in a much more productive way. 
I still have the dilemma of what to do about photoshop though.  I was using photoshop cs4 and I was finally feeling comfortable with it and had a good system down with editing photos.  I have heard lots of good things about lightroom though.  So I'm torn about what to do. Should I upgrade to photoshop cs5 or get lightroom 4?   Lightroom is cheaper which is majorly appealing to me but I want to get something that I can use for a long time. 

So my point in telling you all this is I need help! Do you guys use photoshop or lightroom?  Ugh I don't know what to do. 

Oh in my search for what to do I did discover that you can download a free one month trail of Lightroom 4.  Which is awesome!!So if you're in the same boat as me try it for free! Click here for the link to the download.  I did download it but since its so new I'm still trying to figure it out. It so hard learning new programs! 

Anyways on to the latest craft:

OK you've probably already seen these wreaths around but I've been dying to make one for a long time.  So encase you haven't seen this then please keep reading and if you have bare with me.  These are so inexpensive and so easy to make but look amazing!

This is a wreath made with:
Wire wreath form
newspaper (took about 2)
spray paint
wire or zip ties

Costs me about 5 dollars


Here's how you make it.

Cut the newspaper down to rectangle shapes


Then grab about 5 or 6 sheets of your cut down sheets and lay it across the wire like so:


Then with a piece of wire wrap around the wreath form and center of the newspaper and pull it tight.


Separate the sheets of newspaper


Then scrunch them up


Now do this over and over till the whole wreath form is full.  Pack it tight.


It should end up looking like this:


Next, take it outside and spray paint it with your color of choice.
I then used Raffia to hang it in my room over my mirror.  I think the raffia adds a nice touch but its not necessary, I think it looks good without it too.


Enjoy!


Bye for now!
Chelsea
Pin It!

Thursday, May 3, 2012

Drop cloth Window Treatment

I'm not done with that drop cloth yet!
About a year ago I painted my sons room.  Unfortunately, it came out a little darker then I had hoped.  I'm still so bummed about it!! I've been trying to come up with ways to lighten it without re-painting.  I have painted every room of my house and painting has stopped being fun for me.

While I'm still trying to come up with more ideas the most obvious one is to put in a lighter colored curtain.   Before I had a darker blue color, two paneled curtain with a rod.  Any one else sick of curtain rods!  I'm so sick of the holes that have to be drilled in the wall while installing and since this is an older home there are multiple holes from previous owners.  So I decided I'm done with it.  I'll fill in the holes and paint over them and use this method instead.


It's so easy to do and I think it adds some character to his room. I'm really loving it. 
 All I did was measure the width and height of the window.  Cut out a piece of drop cloth to those measurements. Sewed a 1/4th inch seam around.  Once again (same as bed skirt), while I was cutting the fabric I tried to use the existing hem as much as possible to make the sewing process quick and painless.
Then, I cut two long pieces of twine, twice the length of the curtain.  I found the middle of the twine and had one side going down the front and the other up and over the top then down the back side of the curtain.  I then sewed it in place so I wouldn't have to worry about it moving around.  


Then the best part is I used industrial strength Velcro to attach the curtain to the top of the window frame.  I think I might be obsessed with Velcro! I love not having to use nails or screws!  Unlike the Bed Skirt though I did use a long enough strip of Velcro to go all the way across the top of the window frame and the top of the fabric.  I have had it up for a week now and I haven't had any problems with it trying to fall off.


I keep the curtain pulled down at night for privacy


And roll and tie it up during the day to let lots of light.


I wish like crazy I could take all the credit for this idea but I got it from a book I bought a long time ago. It is called Romantic Home Sewing Cottage-style Projects to stitch for the Home by Christina Strutt. 


I want to live inside this book! Eveyr picture is beautiful and sometime if I need some inspiration with my home projects I sit and flip through it.   Click on the link above if you want to look into it more.  I've always been in love with the rustic, cottage style.

The only thing I did differently is by using the drop cloth fabric.  I would like to make another one for my daughters room using more of a light weight fabric like she does in the book, though.

Well that all for today! Please don't hesitate to ask any questions or let me know whats on your mind!

Chelsea

Pin It!

Monday, April 30, 2012

Drop Cloth Bed skirt


Back to my lack of storage....
 Sorry hope you don't get too tired of hearing me complain about this fact...

 I have to have storage bins under my bed and because of this I have been in the need of good bed skirt.  I did actually have one that I bought a long time ago but it never seemed to hang down long enough or was always getting bunched up.  Plus, it was the wrong color and just time for an update.  

Every once in a while I would look at a pattern for a bed skirt and think about making one.  The thing that always stopped me was when I'd get to the part where you needed  yards and yards of fabric that goes UNDER the mattress.  I always felt that was such a waste of fabric!  

So here is my quick and inexpensive way of making a bed skirt without wasting all that fabric under the mattress.  


All I used was:

 Paint canvas drop cloth  
a sewing machine
and my new favorite thing Velcro
That's it!

I apologize I can not remember how big of a drop cloth I bought.  I was sure I saved the packaging the canvas came in so when I was writing this up I could for sure tell you.  Of course I can't find it!  I'll I can say is I bought mine at home depot and I bought the one that was close to 20 dollars. I bought that big thinking I could make a few different projects with it.  Wow! It ended up being a TON of fabric.  But this is awesome heavy duty fabric! 

First, I measured the length and width of my box spring, then measured from the top of my box spring to how far down I wanted the bed skirt to hang.  Then added a 1/2 in for seam allowance. I cut out two long strips for the sides and one strip for the width. I cut the side strips a few inches longer so I could do pleats around the corners. When I was cutting out my strips I tried to keep the existing hem as much as possible.  Once it came time to sew hems this was a huge time saver!  Before sewing hems though, I sewed one side strip to the width strip. Then the width strip to the last side strip.  You are then left with one long strip of fabric.
  
I was able to make it so the bottom of the bed skirt was all existing hem so all I had to sew was up the ends and across the top. My hem was 1/4 in and I only turned the fabric down once.  Then, I did a little mock run and pinned it to the box spring just to be sure it wrapped around like I wanted it to.  Plus, then I was able to figure out where the pleats needed to go and where to cut the slit on the corners so it would lay flat over the bed frame.  Then I took it off the box spring, sewed the pleats and sewed a hem around my slit on the corners.    


Then I got industrial strength Velcro and used about 5 in strips.  Place one side of the Velcro at each corner of the box spring and the other side of Velcro on the inside of the bed skirt. 


I tried to keep the bed skirt pulled nice a tight as I was connecting the Velcro.  I did end up going back and adding an extra strip of Velcro in the center of the side of the box spring. 
That's it!

This was an awesome afternoon project, came together very fast. I love how heavy this fabric is, it makes it hang nicely.  Now, I don't have to worry about the storage bins under my bed being seen.

I love it! 


Happy Monday to you all!

Chelsea
Pin It!

Wednesday, April 25, 2012

Garage Work table

During my birthday in March I asked for a chop saw.  I know that might sound like a weird request but I love being able to make things for my home.  A long time ago my husband got me a jigsaw and I love it but I felt the need for something that I could make angle cuts and more efficient straight cuts.  My hands most the time just aren't steady enough to get a perfectly straight cut.  So my wonderful husband got me a chop saw. :)  I'm very excited!! I already have a list a mile long of projects I want to make. 

Only there is one problem.  I had no table to put it on.  Well that just had to change, so here is how I made a work table for my garage.  I have a pile of wood that something has to be done with, so this table was made with supplies I had on hand. 

First I measured the area where I wanted my table to be. Then I had some plywood that I cut down to that size with my jigsaw.  Then I made a frame for the plywood to sit on out of 1x4s.   


Then I placed the plywood on top and nailed in place.


Then I flipped it over.  I knew since my plywood isn't very thick that I would need to reinforce it to make it stronger.  So I cut 2x4s down to size and placed them in the center.  I tried to space them out evenly then screwed them in place. 


Now for the legs of my table.  I have 2 extra headboards that I didn't need and was very tempted to take them to DI or chuck them but I really liked the posts on them and knew they would make perfect legs for my table.  So I pulled them apart and luckily they were about the right height that I wanted.


Using 2 1/2 inch screws I secured the legs in place.


Flip the table over and Wah La! 


Now I have a nice big work space to build!  It might be sad how excited I am about it :)
I have an idea of what to put on the wall behind the table to help organize our tools.  I'm excited to show you! Hopefully I'll be able to get that done in the next week.

Happy building! :)

Chelsea
Pin It!